How to Upload a Virtual Machine to Ssh
Linux
To transfer files to Compute Engine VM instances, dissimilar options are bachelor depending on your workstation Os and the target VM example OS.
| Transfer from | To Linux VMs |
|---|---|
| Linux or macOS |
|
| Windows |
|
Transfer files through Cloud Storage
Deject Storage buckets tin exist a convenient intermediate transfer point between y'all and your VMs.
This file transfer method works on nigh all operating systems and VM types equally long as your VM has access to your Deject Storage bucket through a service business relationship or through your personal user credentials.
Upload your files from your workstation to a Cloud Storage bucket. So, download those files from the bucket to your instances.
- Create a Cloud Storage saucepan or identify an existing saucepan that you desire to utilise to transfer files.
- From your workstation, upload files to the bucket.
- Connect to your VM using SSH.
- On your VM, download files from the bucket.
If you need to transfer files in the other direction, reverse the process. Upload the files from your VM, and so download those files to your workstation.
Transfer files using SSH in the browser
If you tin institute an SSH connection to a VM using the SSH from the Browser window, you can use that connection to transfer files to the VM.
- In the Cloud Panel, get to the VM instances page.
Go to VM instances
- In the list of virtual machine instances, click SSH in the row of the instance that you lot desire to connect to.

- Subsequently the connection is established, click the gear icon in the upper right of the SSH from the Browser window and select Upload file. Alternatively, select Download file to download a file from the VM.

- The transfer dialog opens. Specify which file you want to transfer.
If you uploaded a file, the file is in your /home/USER directory.
If y'all downloaded a file, the file is in the default download folder on your local workstation.
Transfer files using the Google Cloud CLI
The Google Cloud CLI provides an SCP file transfer utility, creating an SSH key pair for you the showtime time you connect. Your private key is stored on your local device and its corresponding public key is copied to projection or VM instance metadata.
To transfer files using SCP, yous must have a firewall rule on the network that your VM uses that allows SSH connections on port 22. You can verify that this firewall rules exists by looking for a firewall rule that allows tcp:22 connections in the Google Deject Console.
Go to Firewall rules
If you lot don't have a firewall rule that allows SSH connections on port 22, create the firewall dominion.
Y'all can install the gcloud CLI and use it to re-create files and directories to your VM using the scp control.
The following example copies a file from your workstation to the home directory of the VM.
gcloud compute scp LOCAL_FILE_PATH VM_NAME:~
Replace the following:
-
LOCAL_FILE_PATH: the path to the file on your workstation -
VM_NAME: the proper name of your VM
You can as well copy files and directories from a VM to your local workstation. The following example recursively copies a directory from your VM (the source) to your local workstation (the destination).
gcloud compute scp --recurse VM_NAME:REMOTE_DIR LOCAL_DIR
Supervene upon the post-obit:
-
VM_NAME: the name of the VM -
REMOTE_DIR: the path to the directory on your VM -
LOCAL_DIR: the path where you lot want to put the directory on your workstation
For more information, run into the gcloud compute scp reference documentation.
Transfer files using SCP on Linux and macOS workstations
The scp control-line tool works similarly to the gcloud compute scp control but requires you to manually manage your SSH keys.
To transfer files using SCP, you must have a firewall rule on the network that your VM uses that allows SSH connections on port 22. You can verify that this firewall rules exists by looking for a firewall rule that allows tcp:22 connections in the Google Cloud Console.
Become to Firewall rules
If you don't accept a firewall rule that allows SSH connections on port 22, create the firewall dominion.
The scp tool uses the aforementioned primal files that y'all use to connect to your instances using standard SSH.
-
If you accept non withal applied a public key to your Google Deject Console project or VM instance, create an SSH central pair and add together the public primal to project or instance metadata.
-
Observe the external IP for the VM that you want to send files to. In the Google Cloud Console, go to the VM instances page.
Become to VM instances
-
Use the
scptool to re-create a file from your workstation to the home directory of the target VM. For this example, the private key is at~/.ssh/my-ssh-central.scp -i ~/.ssh/my-ssh-primal LOCAL_FILE_PATH USERNAME@IP_ADDRESS:~
Replace the following:
-
LOCAL_FILE_PATH: the name of the local file that you want to upload -
USERNAME: your username -
IP-Address: the external IP address for your VM
-
Yous can also copy files from a VM to your local workstation by reversing the source and destination variables. For this example, copy a file from your VM to a path on your workstation.
scp -i ~/.ssh/my-ssh-key USERNAME@IP_ADDRESS:REMOTE_FILE_PATH LOCAL_FILE_PATH
Replace the post-obit:
-
USERNAME: your username -
IP_ADDRESS: the external IP address for your VM -
REMOTE_FILE_PATH: the name of the remote file that you want to download -
LOCAL_FILE_PATH: the location on your workstation where you want to download the file to
Transfer files using WinSCP on Windows workstations
On Windows workstations, the WinSCP client lets y'all manage files on your instances through a graphical file browser interface.
WinSCP uses the same key files that you use to connect to your instances using PuTTY.
-
Do the following if you haven't configured key-based SSH hallmark for your case:
-
Create an SSH key pair.
-
Add your public SSH fundamental to your projection'south metadata or to your VM's metadata. For more information, see Add SSH keys to projection metadata or Add SSH keys to case metadata.
-
-
Find the external IP for the VM that yous want to send files to.
- In the Google Cloud Console, get to the VM instances page.
Become to VM instances
- In the list of VMs, find the external IP address in the External IP cavalcade for your VM.
- In the Google Cloud Console, get to the VM instances page.
-
Download and install WinSCP. The default install settings work for most users.
-
Beginning the WinSCP program. A login window opens where you tin configure your connection settings.
-
In WinSCP, configure your connection settings.
-
Select
SCPequally the file transfer protocol in the File protocol field. -
In the Host Proper name field, specify the external IP address for the VM that you want to connect to.
-
In the User name field, specify the Google username that yous use to admission your project. For this example, the user is
example-user.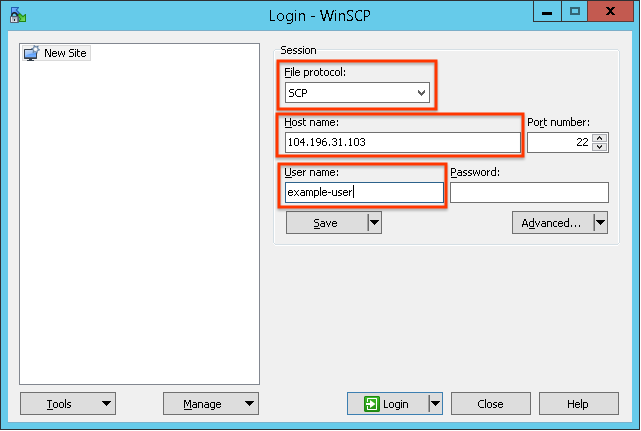
-
-
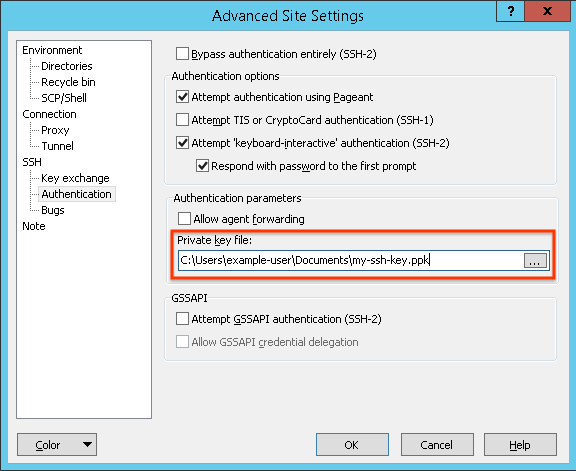
Click the Avant-garde drib-down listing to open the advanced settings, and navigate to SSH > Authentication.
-
In the Private key file box, specify the path to your individual key file of the SSH key pair that you created for the VM.
-
Click Ok to save the avant-garde settings.
-
Click Login to connect to your VM. If the connection is successful, the window opens your local file system on the left and the VM's file arrangement on the right. You can navigate to different directories in these file systems and elevate files to transfer them to and from your VM.
-
You likely do non accept permission to manage nearly files outside of your home directory of the VM. Navigate to the domicile directory of the VM:
/home/USERNAME
-
Use the WinSCP interface to move files between your workstation and the VM.
-
Afterwards you re-create your files to the VM, connect to your instance so that you can execute or move files with full
sudopermissions.
What'due south next
- Connect to your instances to use the files that y'all uploaded.
Source: https://cloud.google.com/compute/docs/instances/transfer-files